迷路クラスの設計と迷路エディタの実装 (Python)
こんにちは。けりです。
今回はPythonで記述した迷路クラスと迷路エディタの紹介です。
作ったもの
Python3の勉強のためにマイクロマウスの迷路ファイルのエディタを作ってみました。
今回作ったのはこちらの動画のようなアプリケーションです。
python + matplotlib で迷路の壁を編集するアプリケーションを作ってみた!壁をポチポチして好きな迷路を生成できる! pic.twitter.com/dtaUpUuAJe
— けり (@kerikun11) April 30, 2020
ファイルから迷路情報を読み込み、クリックで壁を編集してから保存するアプリケーションです。
ソースコード
最新のソースコードは
に公開しています。
また、今回紹介するPythonによる迷路クラスは、私が普段マイクロマウスに使用しているC++によるマイクロマウス迷路ライブラリがベースになっています。
C++による実装に興味がある方はそちらも合わせてご覧ください。
執筆時点のソースコードの取得方法
以下では、執筆時点のソースコード の設計内容を説明します。
GitHubのリポジトリに v1.0 というタグをつけたので、以下のコマンドによって下記で説明されているバージョンのソースコードを取得できます。
git clone -b v1.0 https://github.com/kerikun11/micromouse-maze-data.git
cd micromouse-maze-data
zipファイルでのダウンロードは こちら
迷路クラスの設計
さて、マイクロマウスの迷路クラスの設計です。
Python スクリプト tools/maze.py の Maze クラスでは主に壁情報、スタートやゴール区画の管理を行います。
今回は迷路を以下のようにモデル化してクラス設計を行いました。
方向の表現
迷路内での方向は定数 East, North, West, South で表現します。
列挙型のような使い方です。
とりあえず今回の実装では方向は4方向としました。
今後、斜めも実装する気になったら8方向に拡張したいと思います。
以下、 maze.py の冒頭部分です。
import numpy as np

class Maze:
    """
    a maze class includes wall data, start indexes, goal indexes
    """
    # constants
    East, North, West, South = range(4)
区画座標の表現
区画の座標は、直感的でわかりやすかったのでそのまま x, y 成分で使用しています。
区画座標は numpy.array で表すべきかとも思いましたが、表現の簡潔性からこの表現にしました。
壁の位置の表現
マイクロマウス迷路における壁の表現は結構厄介なものです。
座標 (x, y, d) というように、各区画 (x, y) に対して東西南北 d の4つの壁を保存してしまうと、1つの壁に対して2つの区画が接しているせいで冗長になってしまいます。
そこで私は壁の座標を (x, y, z) という別の表現で重複がなくなるようにしています。ただし、 (x, y) は通常の区画位置ですが、z は壁の区画 内 位置です。
区画内位置 z は 1bit の変数で、 z=0 なら区画 (x, y) の東壁、 z=1 なら区画 (x, y) の北壁であることを表します。
これによって、 (x, y, z) で迷路内(と東と北の外周)の N * N * 2 個の壁を重複なく表現することができます。ただし、 N は迷路サイズです。
そして、この座標 (x, y, z) をもとに壁ID wall_index = x + y * N + z * N * N を定義します。
このIDは、迷路内の全壁の通し番号となり、配列のアクセスなどに活用することができます。
ちなみにマイクロマウスでは、 N が2の累乗数なので、Nの掛け算の代わりに log2(N) 個のビットシフトで計算することもできます。
最後に注意点として、 wall_index の値はフィールド内の壁にのみ有効なので、メソッド is_inside_of_field() によって壁がフィールド内にあることを確認してから計算するようにします。
以下、 maze.py の続きです。
    @classmethod
    def uniquify(cls, x, y, d):
        """
        returns a unique coordinates of a wall without redundancy on both sides of the wall

        Returns
        -------
        int x, int y, int z, int d
        """
        if d == cls.East:
            x, y, z, d = x, y, 0, cls.East
        elif d == cls.North:
            x, y, z, d = x, y, 1, cls.North
        elif d == cls.West:
            x, y, z, d = x-1, y, 0, cls.East
        elif d == cls.South:
            x, y, z, d = x, y-1, 1, cls.North
        return x, y, z, d

    def get_wall_index(self, x, y, z):
        """
        get a unique and sequential index of a wall inside of the maze

        Returns
        -------
        int index
        """
        if not self.is_inside_of_field(x, y, z):
            raise ValueError("out of field!")
        return x + y * self.size + z * self.size * self.size

    def is_inside_of_field(self, x, y, z=None):
        """
        determine if the wall or cell is inside of the field

        Returns
        -------
        bool result
        """
        s = self.size  # maze size
        if z == None:
            return x >= 0 and y >= 0 and x < s and y < s  # cell
        else:
            return x >= 0 and y >= 0 and x < s+z-1 and y < s-z  # wall
コンストラクタ
Maze クラスのコンストラクタでは、迷路サイズを受け取って必要な変数を初期化します。
壁情報は論理値の配列 np.array(dtype=bool) で確保しました。
C++の場合は std::bitset で確保しているのですが、Pythonにはないようなのでこのように bool の配列にしました。
以下、 maze.py の続きです。
    def __init__(self, size=32, start=[], goals=[]):
        """
        construct a maze object with a maze size
        """
        self.size = size  # number of cells on one side of the maze
        # the number of cells in the maze: x * y
        self.cell_index_size = size * size
        # the number of walls to save: x * y * z
        self.wall_index_size = size * size * 2
        # wall data; wall states and known flags
        self.walls = np.zeros(self.wall_index_size, dtype=bool)
        self.knowns = np.zeros(self.wall_index_size, dtype=bool)
        # start and goal cells
        self.start = start
        self.goals = goals
壁の取得
次に壁情報の取得や更新の部分です。
実装を共通化するため、壁の更新と取得はひとつのメソッドで行います。
以下、 maze.py の続きです。
    def wall(self, x, y, d, new_state=None, new_known=None):
        """
        get or update a wall flag, and optionally update a known flag

        Returns
        -------
        bool flag
        """
        x, y, z, d = self.uniquify(x, y, d)
        # If it is out of the field, the wall is assumed to exist.
        if not self.is_inside_of_field(x, y, z):
            return True
        i = self.get_wall_index(x, y, z)
        if new_state != None:
            self.walls[i] = new_state
        if new_known != None:
            self.knowns[i] = new_known
        return self.walls[i]

    def known(self, x, y, d, new_known=None):
        """
        get or update a known flag of a wall

        Returns
        -------
        bool flag
        """
        x, y, z, d = self.uniquify(x, y, d)
        # If it is out of the field, the wall is assumed to be known.
        if not self.is_inside_of_field(x, y, z):
            return True
        i = self.get_wall_index(x, y, z)
        if new_known != None:
            self.knowns[i] = new_known
        return self.knowns[i]
迷路情報の表示
迷路サイズやゴールの位置などの迷路情報を表示するメソッドです。
以下、 maze.py の続きです。
    def __str__(self):
        """
        show information of the maze

        Returns
        -------
        string
        """
        return f'size: {self.size}x{self.size}' + '\n' + \
            'start: ' + ', '.join([f'({x}, {y})' for x, y in self.start]) + '\n' + \
            'goals: ' + ', '.join([f'({x}, {y})' for x, y in self.goals])
迷路ファイルの解析と生成
次に説明するのは、迷路の保存形式です。
私は過去の大会の迷路情報を以下に示すようなテキスト形式で保存しています。
+---+---+---+---+---+---+---+---+---+
|   |       |       |       | G   G |
+   +   +   +   +   +   +   +   +   +
|       |       |       |   | G   G |
+   +   +---+   +   +---+   +---+   +
|   |           |       |           |
+   +---+   +---+   +---+---+   +---+
|       |       |           |       |
+---+   +   +   +---+---+   +---+   +
|       |   |       |       |       |
+   +   +---+---+   +   +   +   +   +
|   |   |       |       |       |   |
+   +   +   +   +---+   +---+   +   +
|   |       |       |           |   |
+   +---+   +---+   +---+   +---+   +
|       |   |       |           |   |
+   +   +   +   +---+   +---+   +   +
| S |       |                       |
+---+---+---+---+---+---+---+---+---+
この形式の迷路を読み込んだり書き出したりする部分のコードです。
以下、 maze.py の続き:
    @staticmethod
    def parse_maze_string(file):
        """
        parse a maze string from file and construct a maze object

        Returns
        -------
        Maze object
        """
        lines = file.readlines()
        maze_size = max(len(lines)//2, len(lines[0])//4)
        maze = Maze(maze_size)  # construct a maze object
        for i, line in enumerate(reversed(lines)):
            line = line.rstrip()  # remove \n
            # +---+---+---+---+
            if i % 2 == 0:
                for j, c in enumerate(line[2:: 4]):
                    if c == '-':
                        maze.wall(j, i//2, Maze.South, True, new_known=True)
                    elif c == ' ':
                        maze.wall(j, i//2, Maze.South, False, new_known=True)
            # |   |   | G |   |
            else:
                for j, c in enumerate(line[0:: 4]):
                    if c == '|':
                        maze.wall(j, i//2, Maze.West, True, new_known=True)
                    elif c == ' ':
                        maze.wall(j, i//2, Maze.West, False, new_known=True)
                for j, c in enumerate(line[2:: 4]):
                    if c == 'S':
                        maze.start.append([j, i//2])
                    if c == 'G':
                        maze.goals.append([j, i//2])
        return maze

    def get_maze_string(self):
        """
        generate a maze string to be saved in text format

        Returns
        -------
        string
        """
        res = ''  # result string
        for y in reversed(range(-1, self.size)):
            # +---+---+---+---+
            res += '+'  # first pillar
            for x in range(self.size):
                # horizontal wall
                if not self.known(x, y, Maze.North):
                    res += ' . '
                elif self.wall(x, y, Maze.North):
                    res += '---'
                else:
                    res += '   '
                res += '+'  # pillar
            res += '\n'
            # |   |   | G |   |
            if y == -1:
                break
            res += '|'  # first wall
            for x in range(self.size):
                # cell space
                if [x, y] in self.start:
                    res += ' S '
                elif [x, y] in self.goals:
                    res += ' G '
                else:
                    res += '   '
                # vertical wall
                if not self.known(x, y, Maze.East):
                    res += '.'
                elif self.wall(x, y, Maze.East):
                    res += '|'
                else:
                    res += ' '
            res += '\n'
        return res
Mazeクラスの使用例
ここまでに紹介した maze.py の使用例を紹介します。
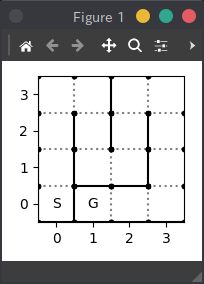
ターミナルで迷路ファイルを指定して実行すると以下のように表示されます。
$ python3 tools/maze.py data/04_test_01.maze

size: 4x4
start: (0, 0)
goals: (1, 0)
+---+---+---+---+
|       |       |
+   +   +   +   +
|   |   |   |   |
+   +   +   +   +
|   |       |   |
+   +---+---+   +
| S | G         |
+---+---+---+---+
以下、 maze.py の最後の部分です。
import sys

# example
if __name__ == "__main__":
    # check arguments
    if len(sys.argv) < 2:
        print('please specify a maze file.')
        sys.exit(1)

    # set filepath
    filepath = sys.argv[1]

    # read maze file
    with open(filepath, 'r') as file:
        maze = Maze.parse_maze_string(file)

    # show info
    print(maze)
    print(maze.get_maze_string())
迷路エディタの設計
次に、迷路エディタアプリケーションの紹介です。
Python スクリプト tools/maze_editor.py の MazeEditor クラスは、迷路をウィンドウに描画して壁を編集する機能を搭載します。
冒頭部分
ここでは numpy モジュール、 matplotlib モジュールと上記で紹介した迷路モジュール maze.py を読み込みます。
MazeEditor のコンストラクタでは、 Maze class のオブジェクトを受け取ります。
以下、 maze_editor.py の冒頭の部分です。
import math
import numpy as np
import matplotlib.pyplot as plt

from maze import Maze  # calls ./maze.py

class MazeEditor:
    """
    paint a maze with matplotlib.pyplot
    """

    def __init__(self, maze):
        """
        construct a maze editor object with a maze object
        """
        self.maze = maze  # maze object
迷路の表示
次に、迷路の表示部分です。
Pythonの数値プロットライブラリ matplotlib を用いて迷路を描画します。
以下、 maze_editor.py の続き:
    @staticmethod
    def draw_wall(maze, x, y, d, fmt='k', **kwargs):
        x, y, z, d = Maze.uniquify(x, y, d)
        if z == 0:
            x, y = [x+1/2, x+1/2], [y-1/2, y+1/2]
        else:
            x, y = [x-1/2, x+1/2], [y+1/2, y+1/2]
        plt.plot(x, y, 'w', lw=2)  # erase wall
        plt.plot(x, y, fmt, **kwargs)  # draw new wall
        plt.plot(x, y, 'k.')  # draw pillars

    def draw_maze(self):
        maze = self.maze
        # print walls
        for i in range(maze.size+1):
            for j in range(maze.size):
                # +---+---+
                if maze.wall(i, j, Maze.South):
                    self.draw_wall(maze, i, j, Maze.South)
                else:
                    self.draw_wall(maze, i, j, Maze.South, ':', color='gray')
                # |   |   |
                if maze.wall(j, i, Maze.West):
                    self.draw_wall(maze, j, i, Maze.West)
                else:
                    self.draw_wall(maze, j, i, Maze.West, ':', color='gray')
        # print start and goal character
        for ps, t in [[maze.start, 'S'], [maze.goals, 'G']]:
            for p in ps:
                plt.text(p[0], p[1], t, ha='center', va='center')
        plt.axes().set_aspect('equal')  # set the x and y axes to the same scale
        plt.xticks(range(0, maze.size+1, 1))
        plt.yticks(range(0, maze.size+1, 1))
        plt.xlim([-1/2, maze.size-1/2])
        plt.ylim([-1/2, maze.size-1/2])
        plt.tight_layout()
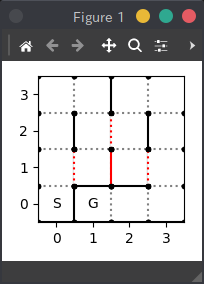
壁の編集機能
次に、迷路中の壁の編集部分です。
壁の付近をクリックしたときに、その壁が反転するようにしています。
また、編集した壁はわかりやすいように色を変えて表示しています。
以下、 maze_editor.py の続き:
    def attach_wall_toggle(self):
        plt.connect('button_press_event', self.button_press_event)

    def button_press_event(self, event):
        maze = self.maze
        x, y = event.xdata, event.ydata
        xf, xi = math.modf(x)
        yf, yi = math.modf(y)
        z, d = [0, Maze.East] if abs(xf-1/2) < abs(yf-1/2) else [1, Maze.North]
        if z == 0:
            x, y = int(round(x-1/2)), int(round(y))
        else:
            x, y = int(round(x)), int(round(y-1/2))
        w = not maze.wall(x, y, d)
        c = 'r' if w else 'r:'
        maze.wall(x, y, d, w, new_known=True)
        MazeEditor.draw_wall(maze, x, y, d, c)
        plt.draw()
        print(maze.get_maze_string())
迷路エディタの使用例
以下、 maze_editor.py の最後の部分です。
import os
import sys
import datetime

# example
if __name__ == "__main__":
    # check arguments
    if len(sys.argv) < 2:
        print('please specify a maze file.')
        sys.exit(1)

    # set filepath
    filepath = sys.argv[1]

    # read maze file
    with open(filepath, 'r') as file:
        maze = Maze.parse_maze_string(file)
    print(maze)
    print(maze.get_maze_string())

    # prepare figure
    figsize = maze.size / 2
    fig = plt.figure(figsize=(figsize, figsize))

    # setup maze editor
    mp = MazeEditor(maze)
    mp.draw_maze()
    mp.attach_wall_toggle()

    # start
    plt.show()

    # save modified maze
    os.makedirs('output', exist_ok=True)
    datetime_string = datetime.datetime.now().strftime('%Y%m%d-%H%M%S')
    basename_without_ext = os.path.splitext(os.path.basename(filepath))[0]
    output_filepath = f'./output/{basename_without_ext}-{datetime_string}.maze'
    with open(output_filepath, 'w') as file:
        file.write(maze.get_maze_string())
        print('modified maze data saved: ' + output_filepath)
ターミナルで迷路ファイルを指定して以下のコマンドを実行すると迷路ウィンドウが表示されます。
$ python3 tools/maze.py data/04_test_01.maze
壁の近くを適当にクリックすることでその壁の有無を切り替えることができます。
ウィンドウを閉じると以下のようにファイル名に日時を付加して保存されます。
...
modified maze data saved: ./output/04_test_01-20200504-162035.maze
$ cat ./output/04_test_01-20200504-162035.maze
+---+---+---+---+
|       |       |
+   +   +   +   +
|   |       |   |
+   +   +   +   +
|       |       |
+   +---+---+   +
| S | G         |
+---+---+---+---+
これで迷路ファイルの編集ができました!
まとめ
今回は Python で実装した迷路クラスと迷路エディタを紹介しました。
迷路クラスの設計は実際にマウスで使用する C/C++ での実装にも役に立つと思いますので是非参考にしてみてください。
Python はちょっとしたアプリケーションを作る際にとても便利なので、慣れておきたいところです。
もし、もっといい書き方があるよと気づいた方は是非教えてください!
よろしくおねがいします。