IR Station
IR-Station
Infrared Remote Controller with ESP8266 WiFi-module
You can control your home appliances with your smartphone or laptop.
The latest information is here .
Main parts
- ESP-WROOM-02 (ESP8266 WiFi Module)
- IR Receiver
- IR LED
- Indicator LED
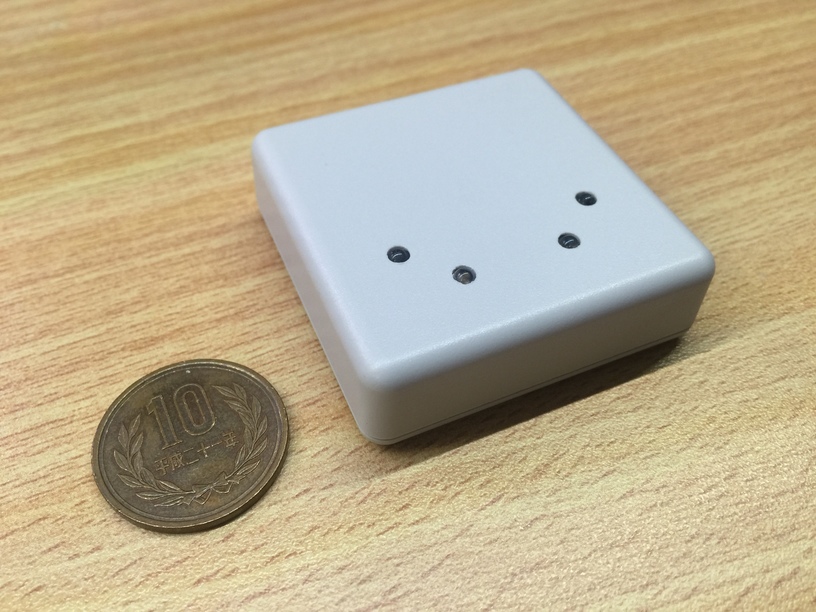
Looks
The Device’s Appearance
body
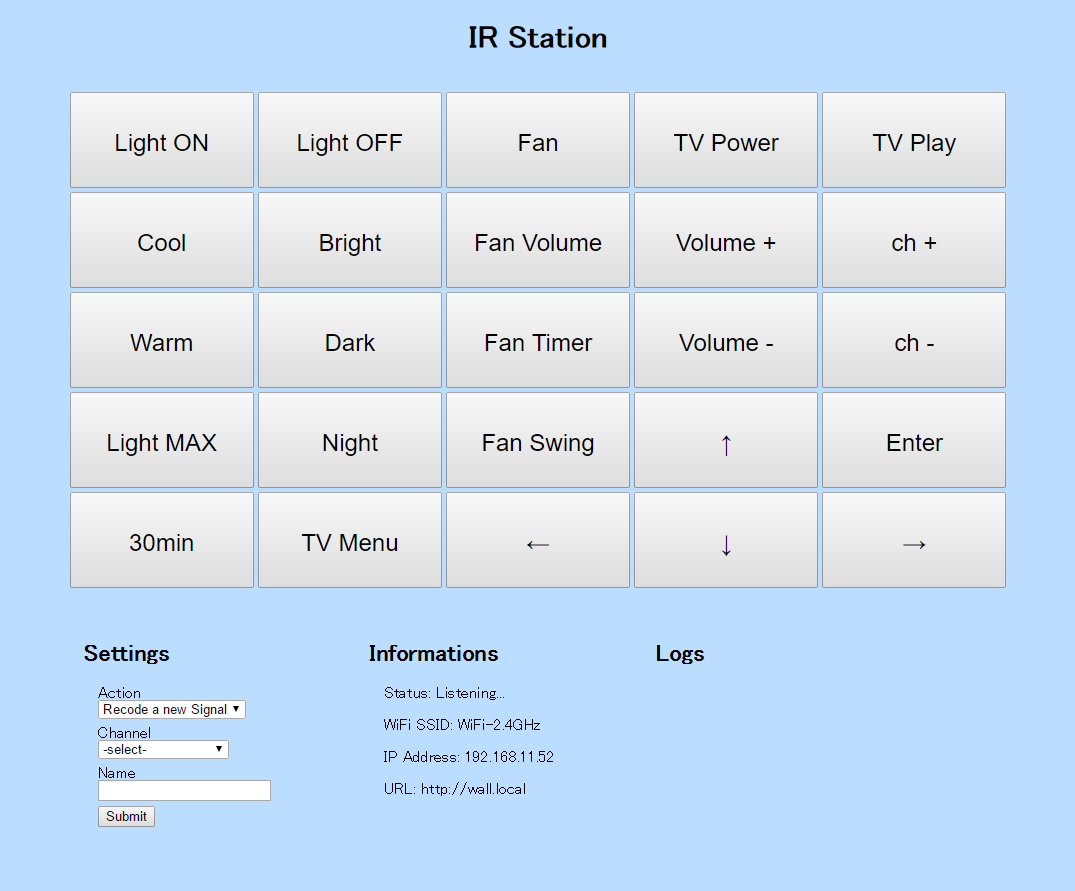
Display Sample
display
How to Use
Setup the Device
- Supply power to the device.
- Connect your cellphone or laptop to Wi-Fi SSID “IR-Station”.
- Access http://192.168.4.1 in a browser
- Enter Wi-Fi SSID of your home and its password
- Enter a device name you like. We call it the hostname. Because it will be a part of URL, you cannot use space character.
- If connection succeeded, IR-Station’s local IP address is displayed. Please make a note of it.
- Connect your cellphone or laptop to your home’s Wi-Fi.
- Access http:/xxx.xxx.xx.xx (IR-Station’s local IP address) in a browser. (for example http://192.168.11.3 )
- If something appears, setup is complete.
Store Signals
- Access http:/192.168.xx.xx (one example) in a browser. 1. Look at the form of the bottom of the screen.
- Select “record a new Signal” action.
- Select a channel you want to assign a new signal.
- Enter a name of the signal.
- When you click the “Submit” button, the green LED of your IR-Station will light up.
- Press a button on your remote controller toward your IR-Station to store a new signal.
Remote Control
- Access your IR-Station in a browser.
- Click a button which assigned a signal you want to send.
Meanings of LED Indicator
| Color | Status |
|---|---|
| Red | Error |
| Green | Processing |
| Blue | Listening |
How to Make
Required Library
Please Add the Libraries below to your Arduino IDE
- Arduino Json (https://github.com/bblanchon/ArduinoJson )
- Arduino Time Library (https://github.com/PaulStoffregen/Time )
Steps
- Gather the components.
- Assemble the components according to the circuit diagram.
- Connect the device and the PC with a serial-to-USB conversion module.
- Prepare Arduino IDE and serial-USB converter’s driver.
- Open the preferences of Arduino IDE and fill in this URL: http://arduino.esp8266.com/stable/package_esp8266com_index.json to “Additional Boards Manager URLs”.
- Add “Generic ESP8266 Module” in the Arduino IDE Board Manager.
- Add the required libraries to your Arduino IDE in the Arduino IDE Library Manager or zip files.
- Open IR-Station firmware in the Arduino IDE.
- Select “Generic ESP8266 Module” and configure each item of board settings properly. See Arduino Board Settings below.
- Select correct serial COM port and upload program to the device. When upload program, GPIO0 and GPIO2 must be pulled-up, and GPIO15 must be pulled-down. It’s necessary to reset the device immediately before upload. It’s a little difficult.
- The uploading takes about 30 seconds.
- Upload the SPIFFS data: menu -> tool -> ESP8266 Sketch Data Upload. (See https://github.com/esp8266/Arduino/blob/2.3.0/doc/filesystem.md )
- Process termination.
Arduino Board Settings
| item | select |
|---|---|
| Board | ESPino (ESP-12 Module) |
| Flash Mode | QIO |
| CPU Frequency | 80MHz |
| Flash Size | 4M(3M SPIFFS) |
| Reset Method | ck |
| Upload Speed | 115200 |
Components
Device Components
| Components | Details | Quantity | Remarks |
|---|---|---|---|
| ESP8266 WiFi Module | ESP-WROOM-02 | 1 | |
| IR receiver | OSRB38C9AA | 1 | Power: 3.3V |
| IR LED | OSI5FU3A11C | 4 | anything maybe OK |
| Voltage Regulator | NJU7223-33 | 1 | output: 3.3V 500mA |
| Nch MOS-FET | IRLML6344 | 1 | |
| Resistor for IR LED | 4.7 ohms, 1W | 2 | |
| Pull-up/down Resistor | 10k ohms | 5 | |
| Indicator LED | OSTBABS4C2B | 1 | |
| Resistor for LED | 100~220 ohms | 3 | |
| Resistor for IR receiver | 220 ohms | 1 | |
| Capacitor for IR receiver | 4.7uF | 3 | |
| Power Stabilization Capacitor | 100uF | 1 | |
| Bypass Capacitor | 0.1uF | 3 | |
| User Button | SKRPACE010 | 1 | |
| Poly Switch | MICROSMD035F-02 | 1 | up to 350mA |
| USB Conncector | USB-Micro-B | 1 | Power Only |
Components
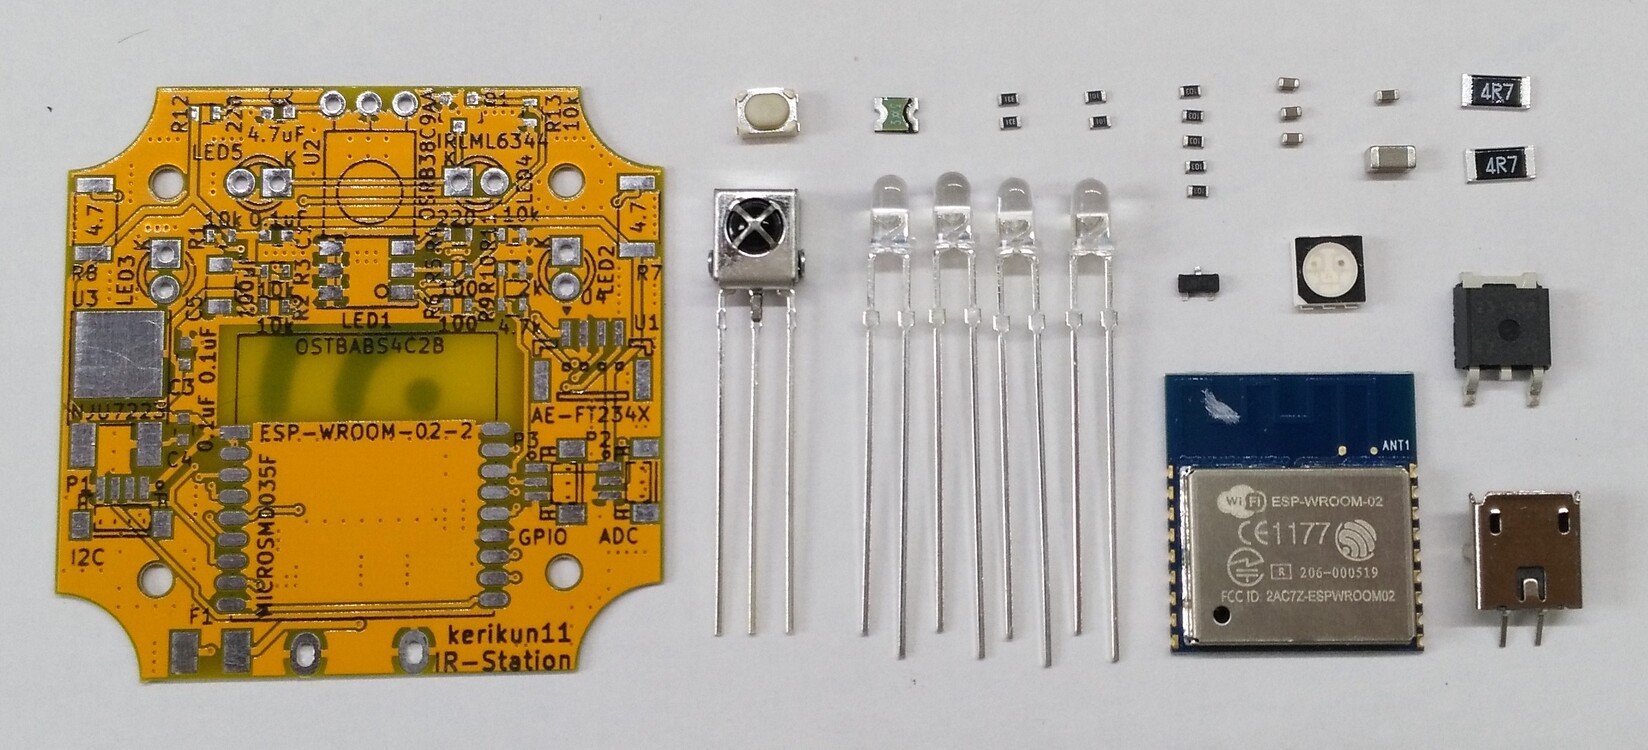
Requires
| Requires | Details | Quantity |
|---|---|---|
| Serial-to-USB conversion Module | such as FT232 | 1 |
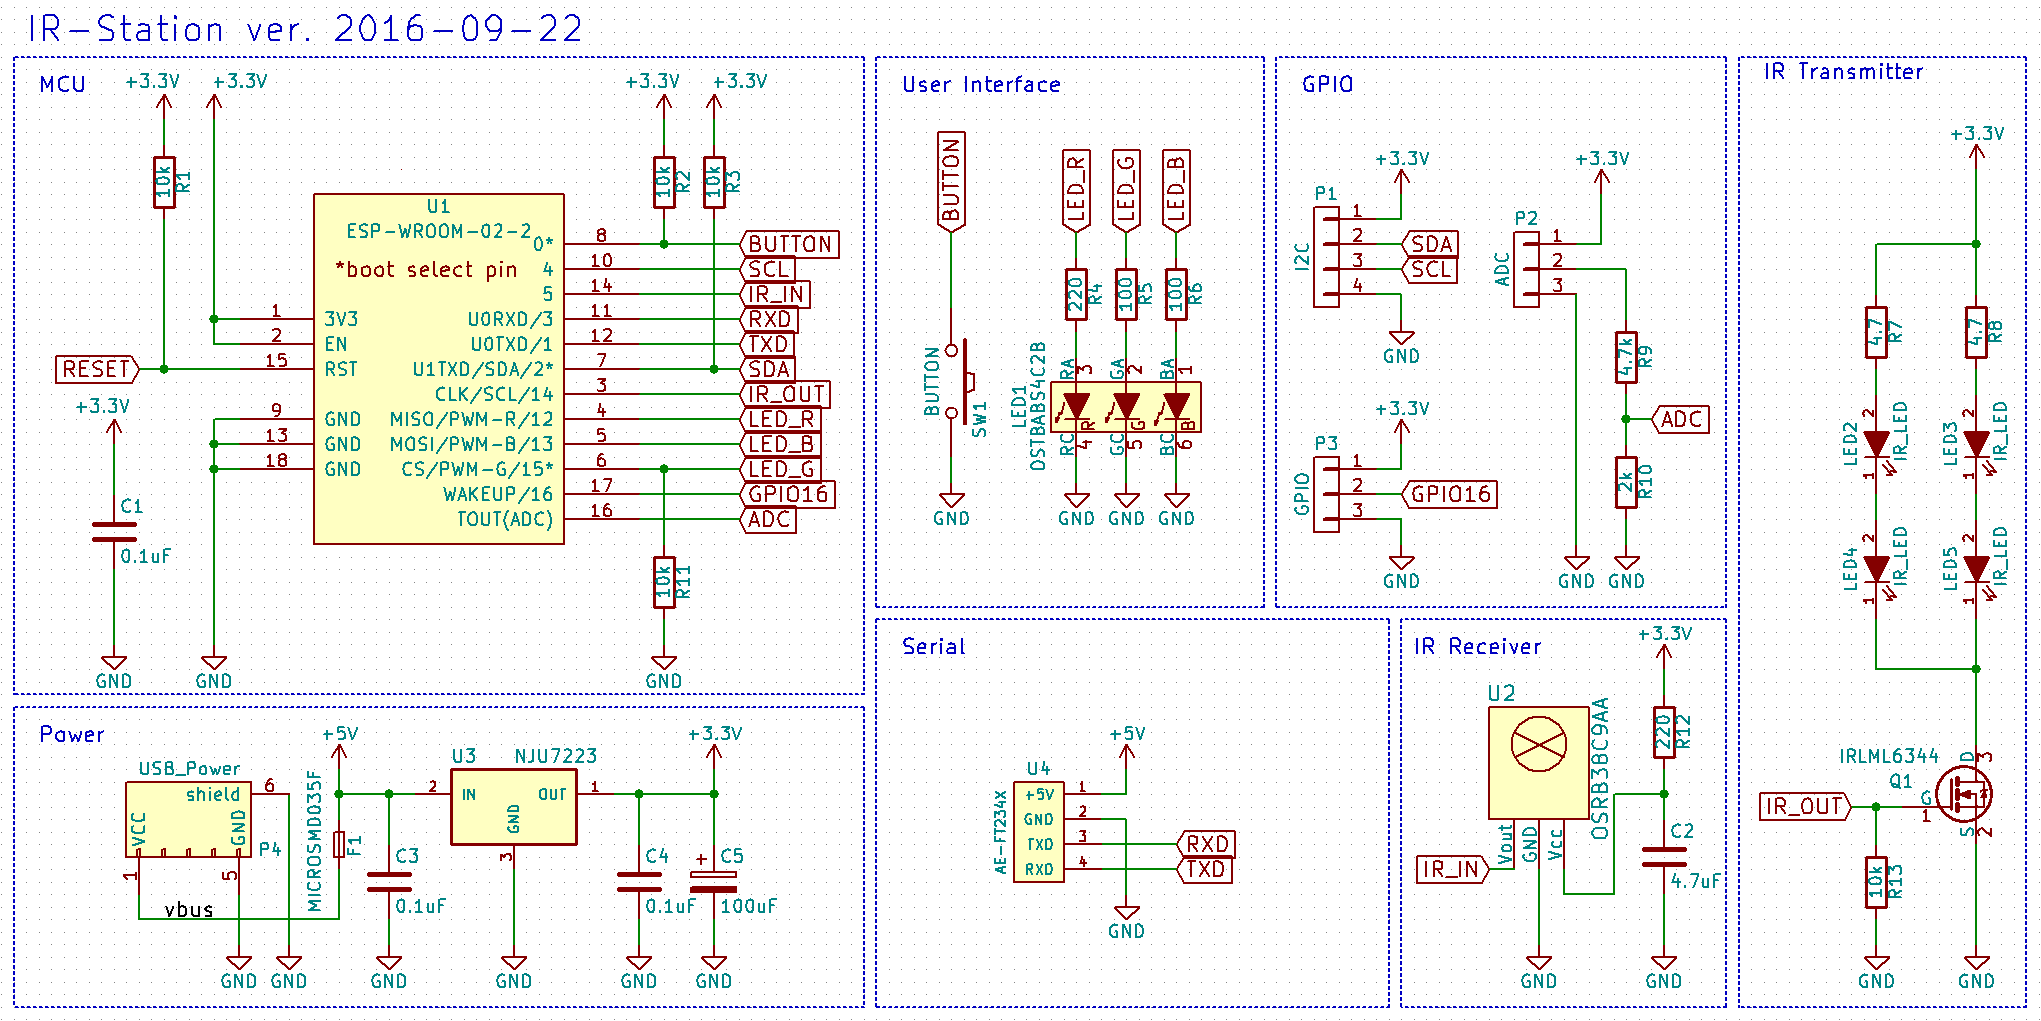
Circuit Diagram
sketch
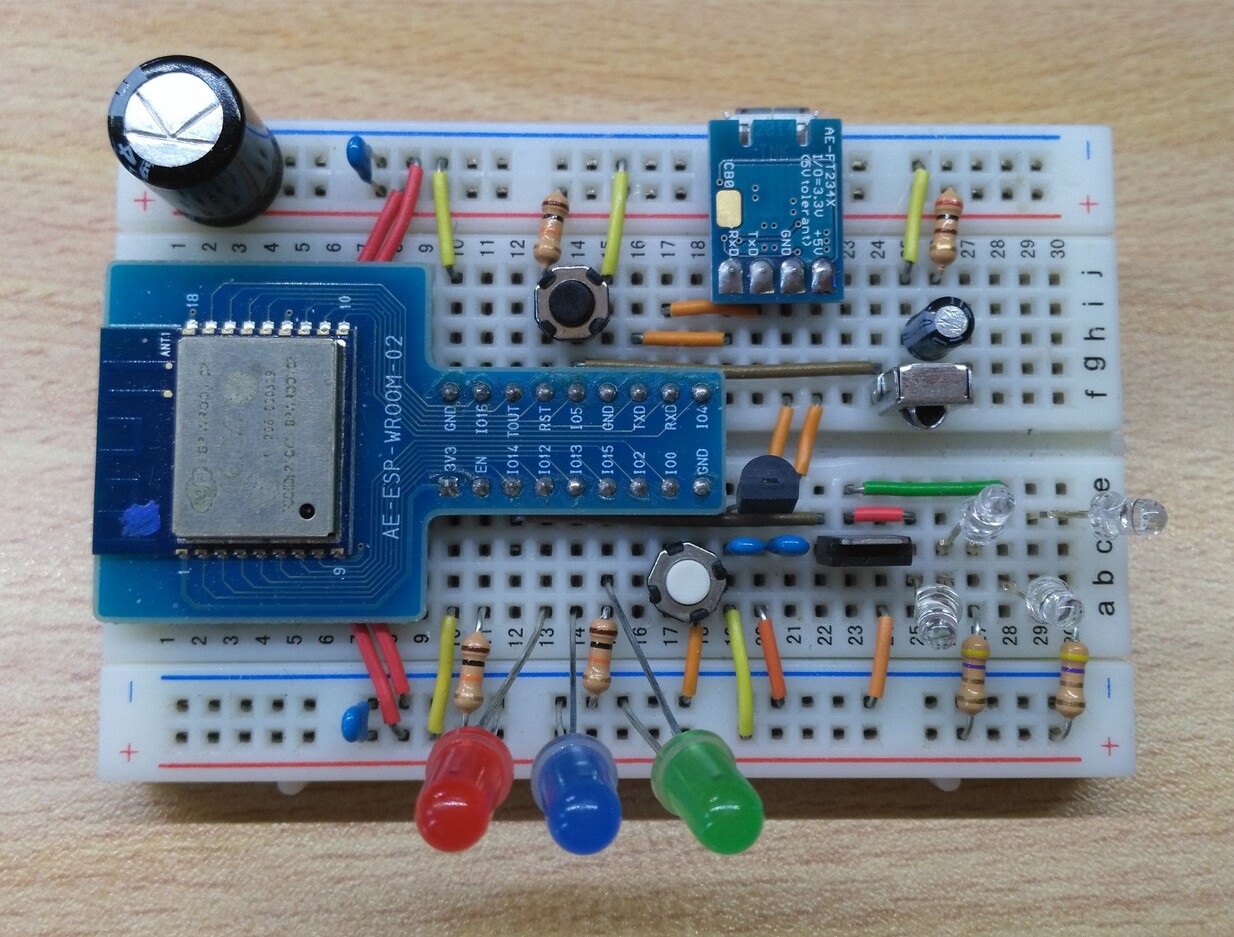
Breadboard Sample
sample
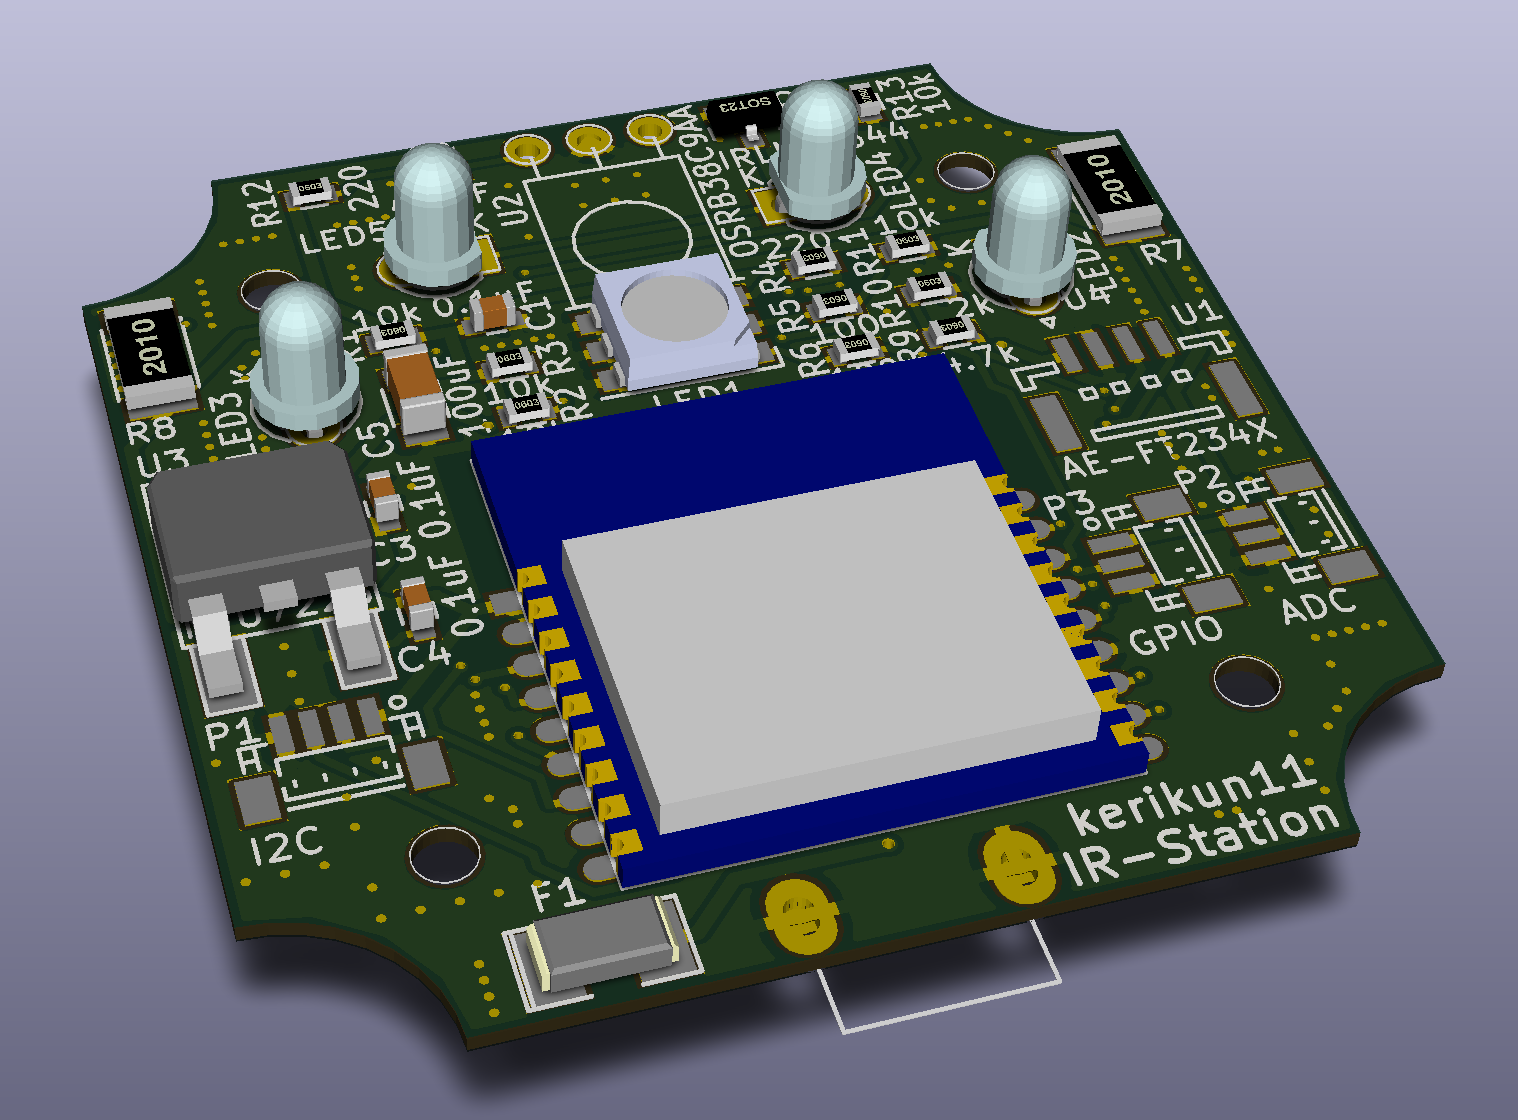
3D shape
3D
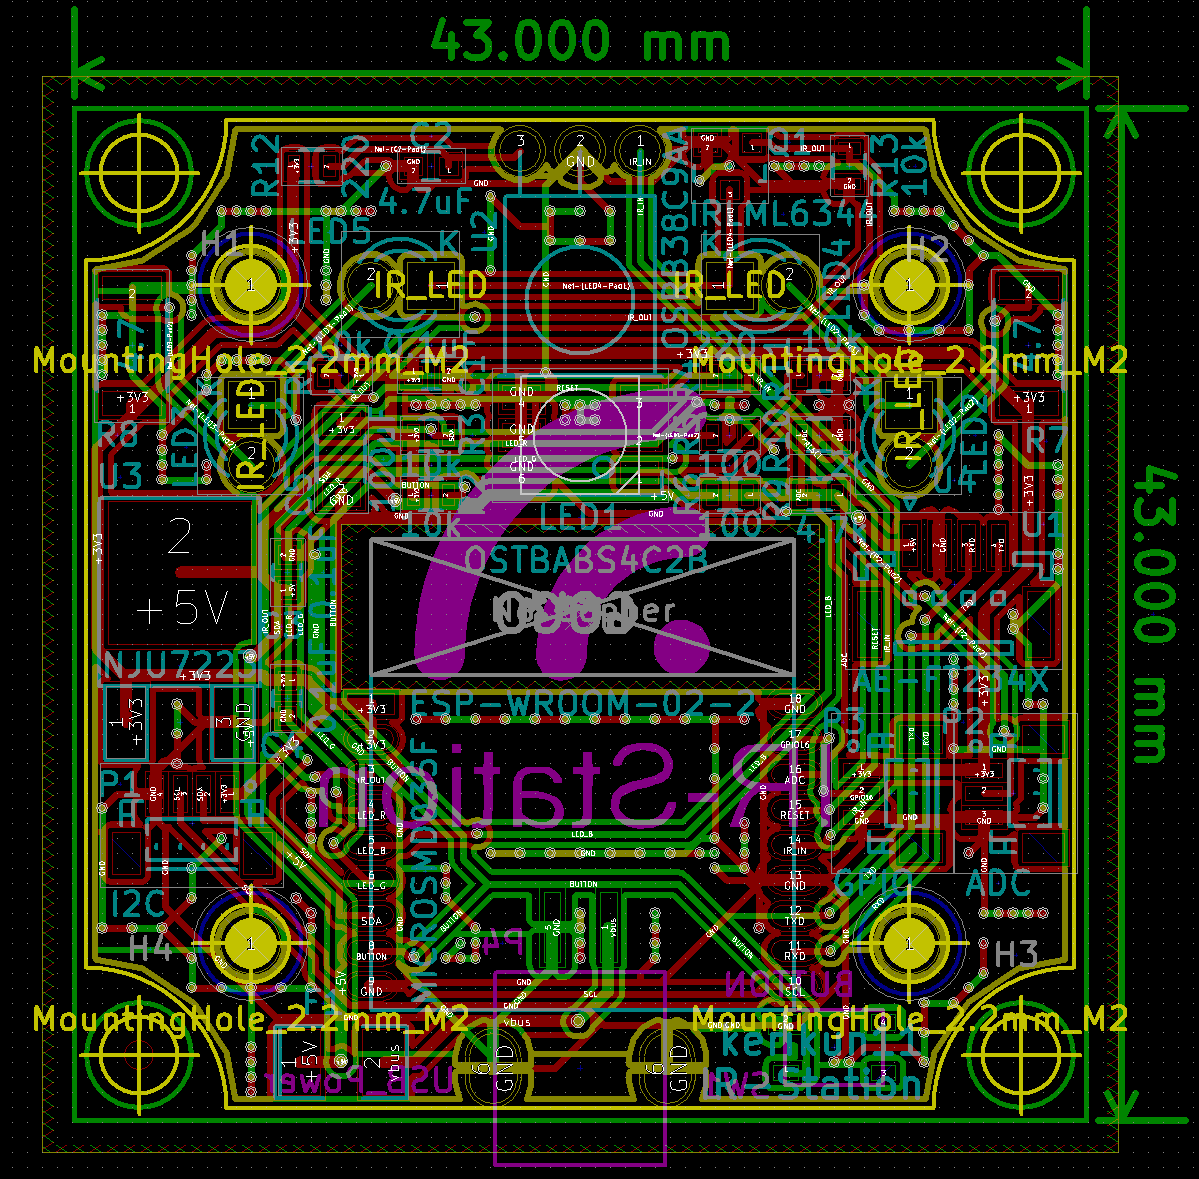
PCB pattern sample
PCB
IR data JSON format
Format
[
	uint16_t microseconds_high, uint16_t microseconds_low, uint16_t microseconds_high, uint16_t microseconds_low, ...
]
Sample
[
	3300,1786,363,1305,390,473,364,476,317,548,289,577,288,501,364,474,390,475,290,550,289,1403,290,551,314,1377,290,552,313,502,362,1379,289,1378,289,1378,314,1377,389,1304,364,476,312,552,290,553,312,474,391,1305,362,501,364,474,361,504,289,553,312,477,363,500,364,476,287,578,289,1377,314,551,290,502,363,476,388,474,391,451,313,551,313,553,288,500,363,1304,385,1362,310,475,389,475,364,477,313,552,288,1380,317,50215,3305,3489,314
]
HTTP API v1.5.0
Setup Form
| Path | Method | Parameter(s) | Return | Remarks |
|---|---|---|---|---|
| / | GET | index.html | setup form page | |
| /wifi/list | GET | a list of (string) | a list of existing WiFi SSID | |
| /wifi/confirm | POST | IP Address or “false” | confirm if WiFi connection is established and reboot the device | |
| /mode/station | POST | ssid, password, stealth, hostname | message | set the device as Station Mode |
| /mode/accesspoint | POST | hostname | message | set the device as AP Mode |
| /dbg | GET | ssid, password | local_ip or “false” |
Main Page
| Path | Method | Parameter(s) | Return | Remarks |
|---|---|---|---|---|
| / | GET | index.html | main page of IR-Station | |
| /info | GET | station.json | a json includes the device information | |
| /signals/send | POST | id | message | |
| /signals/record | POST | row, column, name | message | |
| /signals/rename | POST | id, name | message | |
| /signals/move | POST | id, row, column | message | |
| /signals/upload | POST | irJson, row, column | message | |
| /signals/clear | POST | id | message | |
| /signals/clear-all | POST | message | ||
| /schedule/new | POST | id, time | message | |
| /schedule/delete | POST | schedule_id | message | |
| /wifi/disconnect | POST | none | ||
| /wifi/change-ip | POST | local_ip, subnetmask, gateway | message |
result json
{
	"code":0 or -1,
	"message":"message"
}